• WhatsApp Review

How To Change your Login Password for facebook | Change FB account Sign in Password

How To Change your Login Password for facebook | Change FB account Sign in Password – Facebook password Recovery Finder: The rate at whic...

How To Change your Login Password for facebook | Change FB account Sign in Password

 Access Facebook, Account, Change Password, Changing Facebook Password, Create New Facebook, Facebook Login, Facebook Logout, Facebook Sign Up, Login, Reset Facebook Password, Reset Password     No comments   

How To Change your Login Password for facebook | Change FB account Sign in Password – Facebook password Recovery Finder: The rate at which other users are hacking into other peoples account is quite alarming. You may wish to change your Facebook account password in order… this small piece will guide you through. We’ll also show you how to set password from the desktop and mobile versions of the Facebook website as well as the Apple iOS and Android apps.
facebook login password

Mobile Website

From the mobile version of Facebook, perform these steps:
  1. Login to your Facebook account.
  2. Select the Menu Menu Button button located at the upper-right corner.
  3. Scroll down and select “Account settings“.
  4. Choose “General“.
  5. Select “Password“.
  6. Type your current password, then type your new password in the “New” and “Re-type New” fields.
  7. Select the “Change Password” button when you’re ready.

iOS App

From the Facebook for iPhone or iPad app, perform these steps:
  1. Tap the “More” button located at the lower-right part of the screen.
  2. Select “Settings“.
  3. Select “General“.
  4. Select ” Password“.
  5. Type your current password, then type your new password in the “New” and “Re-type New” fields.
  6. Select the “Change Password” button when you’re ready.

 Android App

From the Facebook for Android app, perform these steps:
  1. Open the Facebook app.
  2. Select the Menu Menu Button button located at the upper-right corner.
  3. Select “Account settings“.
  4. Choose “General“.
  5. Select “Password“.
  6. Type your current password, then type your new password in the “New” and “Re-type New” fields.
  7. Select the “Change Password” button when you’re ready.

Desktop Website

From the desktop version of Facebook, perform these steps:
  1. Login to your Facebook account.
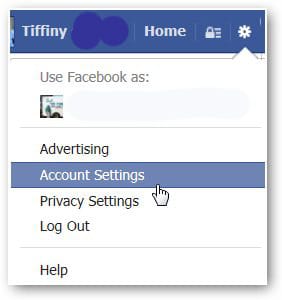
  2. Select the arrow next to the lock located at the upper-right corner and select “Settings“.
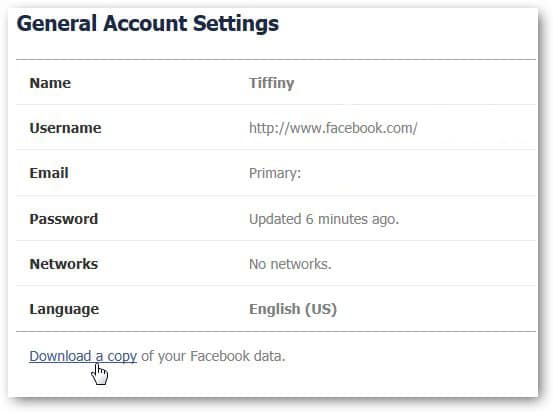
  3. Select the “Edit” link next to the “Password” section.
  4. Type your current password, then type your new password in the “New” and “Re-type New” fields.
  5. Select Save Changes.
  6. Your Facebook password is now changed successfully.
Please share this article!!! 
Read More
  • Share This:  
  •  Facebook
  •  Twitter
  •  Google+
  •  Stumble
  •  Digg

How to Deactivate or Delete Facebook Account

 Deactivate Facebook, Deactivate FB, Delete Account, Delete Facebook, How to     6 comments   

Should you delete or deactivate Facebook account? Learn what the difference between deleting and deactivating Facebook account in this new article. See How to Reset Password on Facebook.


In this article we'll show you the difference between deleting Facebook account and deleting Facebook account.

What are the differences!

Delete implies that you want to permanently remove your Facebook profile from the internet and nothing on earth will make you go back to look for it.

Deactivate means that you just want to take a break from Facebook while still having the choice of going back to your Facebook whenever you want.

In summary, You can delete your Facebook account permanently and deactivate Facebook account temporarily.

How can one delete Facebook account permanently?

This article explains how to delete Facebook account permanently with no choice of returning.
Click on the link above to delete your Facebook account from the web. 


What about deactivating Facebook temporarily?

Click here if you want to deactivate Facebook temporarily.


How to Deactivate or Delete Facebook Account


Recommended: How to Change Facebook Password


Please share this article!
Read More
  • Share This:  
  •  Facebook
  •  Twitter
  •  Google+
  •  Stumble
  •  Digg

Have you deleted your Facebook account temporarily and permanently?

 Deactivate a Facebook account, How do you deactivate Facebook, How to close Facebook, How to Close Facebook account permanently     No comments   

Probably you have decided to delete your Facebook account temporarily or permanently. Your reasons may be among those that are rampant and prevalent these days: your Facebook account has been hacked or you may have forgotten your password.

It is very important to note that whichever decision you choose to take or whichever path you decide to go is different from the other. Deleting your Facebook account temporarily means DEACTIVATION. While deleting your Facebook permanently means total DELETION. As they are different, so do they have different characteristics. And so, we'll take a look at their differences.


Have you deleted your Facebook account temporarily and permanently?

Choosing to deactivate your Facebook account means that:
  • You can reactivate the account whenever you want
  • People will not be able to see your Timeline nor search for you
  • Some information like the messages you exchanged with friends may remain visible.

Choosing to delete your Facebook account means that:
  • Access to your account can't be regained once its deleted
  • Deleting your account may be delayed for a few days after you have made the request. This deletion request will be cancelled if you log into your Facebook account during this period of time.
  • Deleting your data in the back-up system may take up to 90 days and for that reason, your information will not be accessible during this time.
  • Some things are not stored in your account. For example, your friend may still have the messages you both shared after deletion of your account.
  • Copies of some materials like your log records may still remain in Facebook's database but they are disassociated from personal identifiers.
Now, let us show you how to deactivate and delete your Facebook account temporarily

On Your Facebook Application

  • Click on the menu button at the top right hand of your Facebook page.
  • On the pop up screen, scroll down to "Account settings"
  • On the pop-up screen, click on "General"
  • On the pop-up screen, tap on  "Manage Account"
  •  On the pop-up screen, tap on "Deactivate" at the right hand corner.
  • Enter your password on the screen that pops up and tap on "Continue".
  • On the next page, you will be asked if you are sure of the decision to deactivate and to give reasons why you want to deactivate.
  • After you have provided the necessary information, scroll down to the bottom of the page and tap on "Deactivate" to deactivate your account. 
  • You will once again be asked if you want to deactivate your Facebook account, tap on the "Deactivate" button to deactivate your Facebook account.

On Your Browser 

  • Log in your Facebook account details.
  • Click the account menu  at the top right of your Facebook page.
  • On the drop-down menu, select the “Settings” option.
  • The screen that pops up shows your General Account settings, click on "Manage Account"
  • On the screen that drops down under Manage Account, scroll down to "Deactivate your Account"
  • At the bottom of the page, click on the "Deactivate your account" link.
  • A new page will be open, where you need to enter your password.
  • After entering your password, click on the "Continue" button.
  • You’ll be directed to a new page, where you need to tell the reason behind your deactivation.
  • After you've provided the needed information, click on the ‘Deactivate’ button for deactivation.
  • Facebook will once again ask you to confirm your decision to deactivate Facebook account. Click on the "Deactivate Now" button to immediately deactivate your Facebook account.

Recommend:


  • How To Logout of Facebook Account?
  • How Do You Delete a Page on Facebook?
  • See how to Unblock your Facebook friends

If you choose to delete your Facebook account permanently or Delete your account, here's what to do:
*You are advised to download a copy of your Facebook data before you delete your account for future purposes.*

To download a copy of your Facebook data: 
  • Click the downward arrow at the top right of any Facebook page
  • Select "Settings"
  • Click on the link at the bottom of the main menu that says "Download a copy of your Facebook data".
After you have downloaded your data, all you need to do is visit this link: https://www.facebook.com/help/delete_account, click on "Delete my account", then follow the steps to confirm.

If you run into any snags, do let us know in the comment box and we will help you untangle that knot.
Also, don't forget to hit on the share buttons!
Read More
  • Share This:  
  •  Facebook
  •  Twitter
  •  Google+
  •  Stumble
  •  Digg

Delete or Deactivate Facebook Account

 Deactivate Facebook Account, Delete Facebook     No comments   

Delete or Deactivate Facebook Account: If you're ready for a social media break, here's how to delete Facebook.

Delete or Deactivate Facebook Account

Deactivating

Facebook gives you two options: two options: deactivate or delete
The first couldn't be easier. On the desktop, click the drop-down menu at the top-right of your screen and select Settings. Click Security on the left, and you'll see a "Deactivate My Account" link at the bottom. (Here's the direct link to use while logged in.)
If you're on your mobile device, such as using Facebook for iOS, similarly go to Settings > Account Settings >Security and you'll see a link that says "Account – Deactivate."
Facebook doesn't take this lightly—it'll do whatever it can to keep you around, including emotional blackmail about how much your friends will miss you.
As such, "Deactivation" is not the same as leaving Facebook. Yes, your timeline will disappear, you won't have access to the site or your account via mobile apps, friends can't post or contact you, and you'll lose access to all those third-party services that use (or require) Facebook for login. But Facebook does not delete the account. Why? So you can reactivate it later.


Just in case that expected re-activation isn't in your future, you should download a copy of all your data on Facebook—posts, photos, videos, chats, etc.—from the settings menu (under "General").

Account Deletion

To fully delete your Facebook account forever and ever, go to the Delete My Account page at facebook.com/help/delete_account. Just be aware that, per the Facebook data use policy, "after you remove information from your profile or delete your account, copies of that information may remain viewable elsewhere to the extent it has been shared with others, it was otherwise distributed pursuant to your privacy settings, or it was copied or stored by other users."
Translation: if you wrote a comment on a friend's status update or photo, it will remain even after you delete your own profile. Some of your posts and pictures may hang around for as long as 90 days after deletion, as well, though just on Facebook servers, not live on the site.

Deletion on Behalf of Others

If you want to notify Facebook about a user you know is under 13, you can report the account, you narc. If Facebook can "reasonably verify" the account is used by someone underage—Facebook bans kids under 13 to comply with federal law—it will delete the account instantly, without informing anyone.


There's a separate form to request removal of accounts for people who are medically incapacitated and thus unable to use Facebook. For this to work, the requester must prove they are the guardian of the person in question (such as by power of attorney) as well as offer an official note from a doctor or medical facility that spells out the incapacitation. Redact any info necessary to keep some privacy, such as medical account numbers, addresses, etc.

If a user has passed away, a legacy contact—a Facebook friend or relative who was designated by the account owner before they died—can get access to that person's timeline, once approved by Facebook. The legacy contact may need to provide a link to an obituary or other documentation such as a death certificate. Facebook will "memorialize" the page so the deceased timeline lives on (under control of the legacy contact, who can't post as you), or if preferred, remove it.


Facebook Legacy Contact


Designate a specific legacy contact person to handle your account after your passing. You can find that under Settings > Security > Legacy Contact. Once you set one up, you'll get a notification every year from Facebook to double check that the contact should stay the same. You can also take the extra step of making sure that after you die, if the legacy contact does report you to Facebook as deceased, your account gets deleted (even if the legacy contact wants the timeline to be memorialized).
Read More
  • Share This:  
  •  Facebook
  •  Twitter
  •  Google+
  •  Stumble
  •  Digg

How Can I Deactivate My Facebook Account Temporarily?

 Delete, Facebook, Temporarily Deactivate     No comments   

Learn How Can I Deactivate My Facebook Account Temporarily? : Facebook social platform is a cool place to socialize but sometimes you just want to quit. In order to quit Facebook, you are presented with two options:
  • Delete Facebook permanently or
  • Deactivate Facebook account temporarily.
If you choose permanent quitting, you won't be able to reactivate your Facebook account again.
If you choose temporary deletion, you can always come back to Facebook.
How Can I Deactivate My Facebook Account Temporarily?

How To Deactivate Your Facebook Account Temporarily


First of all, you have to login Facebook: www.facebook.com/login


Next, click here, type and re-type  your password.


Choose reason you want deactivate account (any reason).
Next, choose Close:


Next, click Deactivate:

Finally, choose Deactivate Now:


Now, nobody can see you on Facebook, but if you log in your account will Reactivate.
Read More
  • Share This:  
  •  Facebook
  •  Twitter
  •  Google+
  •  Stumble
  •  Digg

Create New Facebook Page | How to create a Facebook Business Page - FB Fan Page Sign Up

 Business Page, Create New Facebook Page, Facebook Page, FB Fan Page, Pages     No comments   

Create New Facebook Page | How to create a Facebook Business Page - FB Fan Page Sign Up – Have you heard of Facebook fan page before? For those who do not know, Facebook page or Facebook business page allows you to voice out your business, movement, brand as well as create awareness on your freelance expertise or draw attention to your startup by connecting you to the people that matters to you.

Facebook fan page is a special feature with easy set up process that mostly starts with you having to choose from a list of templates that suits your motives/business. You get to see lots of template choices ranging from Local Business, Company, Brand, Cause, Artist, etc.

Create New Facebook Page | How to create a Facebook Business Page - FB Fan Page Sign Up


Related Keywords:
how to create a business facebook, page without a personal account, facebook business page tips, facebook business page cost, create personal facebook page, how to create a facebook account, facebook business account, setting up facebook for business


In the virtual world today, Facebook has a high ranking that goes way beyond connecting millions of people all around the world to giving them something of interest and leaving them wanting more, incorporating tools for businesses to manage the viewers consumption to their advantage, and providing virtual offices for free.

Every business today in the corporate world or outside of the corporate world has the tendency to gear towards marketing their products no matter how small, big, digital and non-digital it is. Looking at the Facebook fan page as a marketing tool is the best that could happen for any business. Seizing the opportunity of Facebook having attracted millions of fans to their platform, there is nothing wrong in making you and your business visible.

5 SEPS TO SETUP A FACEBOOK FAN PAGE / BUSINESS PAGE

Directly search facebook.com/pages from your browser or / Click on Pages from the left corner of your Facebook homepage.

  1. Tap on create a page.
  2. Click on the category of choice i.e. Local Business, Company, Brand, Cause, Artist, etc.
  3. Give all necessary information on the form page that appears next.
  4. Agree to the Facebook terms and conditions.
  5. Tap on Get started.
  • On this next stage, be certain to complete all information even down to your profile photo.
  • Get used to the admin panel so you can manipulate it to your advantage easily.
  • Get your page loaded with content.
  • Improve your page for SEO purposes.
  • Invite friends.


WHAT CAN YOU DO WITH FACEBOOK FAN PAGE


WITH FACEBOOK FAN PAGE: You can spread the word about your business/company, communicate 24/7 with your audience all year round, be the sole controller of your new business world and keep improving your statistics by keeping track of your activities.

Thinking you don’t need a Facebook page as a business owner is an entirely flawed way of thinking, I’m just pointing it out there. You don’t only need a Facebook fan page, you actually need it well written and presented as this represents the entire quality of your business.

A Facebook Fan Page Matters Thus It Is Worth Getting It Right! Please share this post with your friends on Facebook so they also learn how to create a Facebook page for their businesses. Thank You.
Read More
  • Share This:  
  •  Facebook
  •  Twitter
  •  Google+
  •  Stumble
  •  Digg

How do you create a private event on Facebook?

 Facebook, Facebook event     No comments   

Remember scrolling through your Facebook and stumbling on "Events"? An event is a calendar-based resource whose function is to notify you of upcoming event. Creating events on Facebook is actually very simple and easy, be it public or private event. If you have been wondering: "How do you create a private event on Facebook? Have no fear, we've always got you covered. Let us now take you through the steps of how you create a private event on Facebook.

How do you create a private event on Facebook?

ON YOUR APPLICATION 
  1. Click on the menu button
  2. Scroll down and click on "Events"
  3. Click on the blue button at the bottom of the page
  4. The default setting is set for you to create a private event, but if yours shows differently, tap on the drop down button on the top of the screen to choose between a private and public event
  5. Add "Photo"
  6. Add "Event name"
  7. Edit the "starting date and time", and "end date and time" to suit your event
  8. Edit "location"
  9. Edit "details"
  10. Tick or untick the box to allow or disallow guests to invite friends
  11. Add friends to co-host the event by tapping on "Co-hosts"
  12. Tap on "Create" at the bottom of the page to create the event


See also:

  • How to delete Facebook post
  • How do you delete a page on Facebook Android?
  • How Do I Log out of My Facebook Account?
ON YOUR BROWSER
  1. Log in your Facebook account details
  2. On the left-hand side of the Facebook page, click on "Events" (under "Explore")
  3. Click on "Create Event" in the top right
  4. Click to choose between a private or public event (you have to click on "private event")
  5. Fill in the "Event name"
  6.  Fill in the "details" 
  7. Fill in the "location" 
  8. Fill in the "date/time" 
  9. Fill in the "description" to give more details to people about the event
  10. Tick or untick the box to allow or disallow guests to invite friends
  11. When you are done, click on "Create Private event" to create the event.
Read More
  • Share This:  
  •  Facebook
  •  Twitter
  •  Google+
  •  Stumble
  •  Digg

How to delete faceɓook account permanently

 Delete, Delete Account, Delete Facebook, delete faceɓook, delete faceɓook account, Facebook Delete, Permanent Delete     No comments   

Have you been thinking of how to delete your Faceɓook account permanently? well, this latest Facebook article will be helpful enough to show you what to do in order to remove your account permanently from Facebook forever.

Facebook is a distraction to an extent especially if you don't know how to turn off annoying Facebook notifications

If you have turn off all notifications including Facebook group notifications, then you should consider temporarily deactivating Facebook to avoid the distractions.

How to delete faceɓook account permanently


However, if you are totally fade up with Facebook, then you should consider to permanently delete your Facebook account.

How to Delete Facebook Facebook Temporarily

  • Go to facebook.com
  • Log into your account details
  • Click on the arrow pointing down from the top corner of your home page
  • Select the ‘settings’ option
  • Next, Select ‘security’ option
  • Select ‘deactivate account’
Follow on-screen instructions to complete the steps

You can delete your Facebook account permanently by following the steps bellow:
  • Click on the arrow down button on the top right side of your home page
  • Next, click on settings and download your data (optional)
  • Now, visit https://www.facebook.com/help/delete_account
  • Select ‘delete my account’
Follow onscreen instructions to complete the step.

See: How to Delete Facebook Permanently Guide


Please let us know your experience during the deletion process and please share this article with your friends who might also be interested in deleting their Faceɓook account permanently

Read More
  • Share This:  
  •  Facebook
  •  Twitter
  •  Google+
  •  Stumble
  •  Digg

Are You Just Tired Of Facebook? Delete or Deactivate Your Account For The Mean Time

 Delete, Facebook     1 comment   

Are You Just Tired Of Facebook? Deactivate Your Account For The Mean Time: In this Facebook guide, you'll see how to deactivate or delete Facebook account using the updated Facebook settings.


If you are looking for the best and quickest way to remove your Facebook account, then read this article to the end and check out the useful video in it. You'll be amazed how quick and easy it is to deactivate a Facebook account. Don't be afraid, it uses the updated Facebook settings to show you how to go about deactivating your Facebook profile from the net.
 

Steps required to deactivate your Facebook Account


Wait!! who says you cannot deactivate your Facebook temporarily or better still delete Facebook account permanently? Even though we agree that Facebook is the easiest way to keep in touch with our loved ones, we may be biased by thinking in that direction.
I remember what a friend posted before he deleted his account and I quote "I once had a life until someone asked me to create a Facebook account" - It sounded funny but true.

You hardly keep in touch, no visitation, no hang out, just you and your device. That's that on that so let's see how to deactivate your Facebook account and take a break from this Facebook thing.

Note: When you deactivate your Facebook account, you can always reactivate it back and no one will connect with you through out the deactivation period - no one will see your activities, profile and etc.

If deactivating Facebook is not you want and you want to delete your account permanently, then take a look at our recent post: How can i delete my Facebook account permanently?


Check this out:


How to Deactivate Facebook Account temporarily

  • First, you will need to log in to your FB account by entering your Facebook account details.
  • Once you are logged in, take the cursor of your mouse to the arrow icon facing downward located in the top-right corner of the page and click on it.
  • A drop-down menu will appear where you need to select the “Settings” option.
  • Then, select the Security tab from the left panel of the screen.
  • At the bottom of the page, you’ll find the ‘Deactivate your account’ option. Click on it.
  • After clicking the option, a tab will be extended where you need to click on the blue colour ‘Deactivate your account’ link.
  • A new page will be open, where you need to enter the password.
  • After entering a password, click on the ‘Continue’ button.
  • You’ll be directed to a new page, where you need to tell the reason behind your deactivation.
  • After filling the prompt information, click on the ‘Deactivate’ button for deactivation.
  • Facebook will once again ask you to confirm your decision to deactivate Facebook account. Click on the Deactivate Now button to immediately deactivate Facebook account.

If you wish to open a new Facebook account subsequently, see this guide: How to create a Facebook Account.


Was this guide helpful? Please let us know your reason for wanting to leave Facebook in the comment box below. And Please Share it. 

Simplest Way to deactivate Facebook Account


  • Another way of deactivating a Facebook account is by visiting this link on your web browser. www.facebook.com/deactivate

Easiest way to permanently delete Facebook account


The easiest and fun way to get rid of your FB account permanently is by visiting the delete Facebook account link.

See link here: https://www.facebook.com/help/delete_account


Do let us know if you are finding it difficult to deactivate your account and we will be ready to help.


See how many people have been helped through our contact page: learnfacebookbasics.com/p/contact.html

This article first appeared on this page: How to Deactivate My Facebook Account Guide
    Read More
    • Share This:  
    •  Facebook
    •  Twitter
    •  Google+
    •  Stumble
    •  Digg

    The new hoax on Facebook - following me

     Facebook, Facebook Hoax     No comments   

    A new Facebook hoax which has gained popularity this week is scaring so many people into thinking that they are being stalked by unknown people.
    Facebook users are being bamboozled and deceived into spreading the myth that a hidden list could expose who your stalkers are.

    The new hoax on Facebook- following me
    It further goes ahead to claim that those followers would be secretly stalking you, your statuses and updates.
    The rumor says that Facebook will give you the list if you go to your ''Settings'' - to ''blocking and privacy'', and type in ''following me''

    Realistically, when you type into the search bar, Facebook WILL give you a list of friends, places, etc. So, what you are seeing is actually just a list of people who share some letters with the words ''following'' and ''me''.

    Fortunately, the rumor is unfounded and untrue.
    Read More
    • Share This:  
    •  Facebook
    •  Twitter
    •  Google+
    •  Stumble
    •  Digg

    How to delete Facebook Account Permanently on Android Device

     Deactivation, Delete, Facebook Account, Permanent Delete     No comments   

    How to delete Facebook Account Permanently on Android Device: Deleting an account off from Facebook is much more serious thing than deactivating it. When a Facebook account is deactivated, it can be restored by simply logging in with your Facebook user login details.
    You can deactivate your Facebook account in case you want to get rid of Facebook temporarily. On the other hand, if you want to leave Facebook forever and do not want to come back, you can delete the account permanently.

    How to delete Facebook Account Permanently on Android Device


    The Facebook app that almost all Android smartphones have only allows the users to deactivate their accounts. In order to delete your Facebook account permanently using your Android mobile phone, you must consider using the mobile version of the web browser instead of using the conventional Facebook app, and after signing in to your Facebook account from the browser, you must use a particular URL that will redirect you to a new page from where you can permanently remove your account profile off from Facebook.

    How to delete Facebook Account Permanently on Android Device


    Here is how:

    Turn on your Android device.

    Tap the Menu button to go to the apps list.

    Open any of your favorite web browser from the given list of apps.


    After opening the web browser, open Facebook website on a new tab.

    On the opened window, provide your login credentials to sign-in to your Facebook account.


    Once logged-in to your Facebook, copy or type https://www.facebook.com/help/delete_account in the address bar of the web browser.

    On the displayed page, tap the Delete My Account button under the Delete My Account section.


    Once done, on the Permanently Delete Account box, enter your Facebook password in the Password field.

    In the Text in the box field, type the captcha code displayed in the image.

    Finally, tap OK to permanently delete your Facebook account.
    Read More
    • Share This:  
    •  Facebook
    •  Twitter
    •  Google+
    •  Stumble
    •  Digg

    How to Check Archived Messages on Facebook App Android

     Android, App, Archive, Facebook App, Messages     No comments   

    I archived some messages I now want to view again. One answer i found was to click 'more' next to other (once clicking on messages) and then 'view archived. But there is no 'more' to begin with. Can anyone help?
    How to Check Archived Messages on Facebook App Android
    To retrieve your archived messages on Messenger do this:

    • Click on message icon on top menu by home icon
    • Click on other
    • New box opens click on more
    • Click on archives 

    You can also send the person a new chat message, you may see previous archived chat messages.

    Have fun and please share this post with your friends on Facebook. Thanks.
    Read More
    • Share This:  
    •  Facebook
    •  Twitter
    •  Google+
    •  Stumble
    •  Digg

    How to Block My Friends List On Facebook 2018

     Facebook     No comments   

    How to Block My Friends List On Facebook 2018: Privacy is one of the big concerns of Facebook, but recently FB implemented a lot of new settings for maintaining a user’s privacy.

    Now, a user has control on almost everything in their profile (e.g. status, photos, albums etc). The user also has the control of how they want to share material (e.g. with everyone, friends, friends of friends, etc). Users can even manually hide a status from specific people.
    How to Block My Friends List On Facebook 2018
    Search keywords: how to hide friends list on facebook mobile, how to hide friends list on facebook 2017, how can i hide my friends list on facebook, how to hide friends on facebook iphone, how to hide friends list on facebook samsung, how to hide one friend on facebook, how to hide friend list on facebook from public, who can see my friends on facebook mobile

    How to Hide My Friends List On Facebook 2018


    Did you know that you can even hide your friend list? It’s true.

    If you don’t want strangers to see your friend list, then you can just hide it from them. It’s very easy. You can use the enhanced Facebook privacy settings to modify your friend list’s visibility.

    One thing which I have noticed when you keep your friend list public is that many people see that list and start adding friends blindly.


    And seeing common friends, other friends usually accept the friend request. It’s kind of embarrassing when your female friend informs you that some mutual friend of yours has sent her a friend request.

    It’s better to let your friend list be visible only to you and hidden from others.
    This guide has been updated to match the new Facebook privacy settings, as Facebook made some major changes recently. So, follow this new tutorial and hide your Facebook friend list from others:
    • Login to your Facebook account
    • Go to your Profile page
    • Click on Friends
    Now, on your Facebook friend list page, simply click on the “Manage” icon at the top right & click on “Edit Privacy”.

    From here you can control who can see your friend list and who can’t. I usually keep it visible to me only, as this is better for the privacy of my friends because I don’t want them to be bombarded with unlimited friend requests.

    Check out this screenshot for better understanding:

    If you don’t want anyone to see your Facebook friend list, keep the “Who can see your friend list” setting to “Only Me”.

    (Keeping your Facebook friend list visible for others is totally your choice, but my suggestion would be to keep it hidden for the privacy of your friends.)


    That's How to Block My Friends List On Facebook 2018 
    Read More
    • Share This:  
    •  Facebook
    •  Twitter
    •  Google+
    •  Stumble
    •  Digg

    Change Facebook Name

     Access Facebook, Account, Mobile, Name, People     No comments   

    We will show you how to quickly change your name on Facebook to reflect your current name. Marriage can cause a change of name, religion can cause a change of name, etc. Learn how to change your own name on Facebook here.

    First, login Facebook :
    Then, click here and go to General Account Settings:

    Next, enter First Name, Middle Name and Last Name:

    After that, click Review Change:
    Choose how your name will appear on your profile (Jessica Landa or Landa Jessica) :

    Finally, type your password and Save Changes:

    Done.
    That's How To Change Your Name On Facebook
    Read More
    • Share This:  
    •  Facebook
    •  Twitter
    •  Google+
    •  Stumble
    •  Digg

    How to Turn off Facebook Location

     location off, turn off facebook location, turn off location, turn off my location     No comments   

    Maybe you want to take a break from work, family and friends and still stay connected to them at the same time. Maybe you went on holiday or vacation and you took some good pictures to upload on Facebook to see the fun you are having. Do you know you can upload those pictures without giving away your location? All you have to do is to turn off Facebook location. Let us show you how to turn off Facebook Location.


    How to Turn off Facebook Location

    On Your Facebook Application
    1. Click on the menu button at the top right hand of the page
    2. Scroll down and click on "Account settings"
    3. Scroll down and click on "Location"
    4. On the pop-up page, at the bottom of the page, you will see that "Location services" is on.
    5. Tap on it and you will be re-routed to where you can turn off your phone location, TURN IT OFF.

    See: 
    • How to create an Event on Facebook
    • Delete my Faceɓook account Permanently
    • Delete Your Faceɓook Account ~ Delete Faceɓook Account


    Once you are done, press "Back" on your phone and you will be taken back to Facebook. DO NOT TAP ON "TURN ON LOCATION SERVICES".  Doing so will turn on your location and your efforts would have been a waste. When you get back to Facebook, press "Back" till you are taken back to the main Facebook page or until you exit Facebook altogether.
      On Your Browser
      1.  Log in your Facebook details
      2. Go to the post that shows your location
      3. On the top upper right hand of the page, click on the drop down down.
      4. On the drop down menu, select "Change Location"
      5. On the pop-up, click on "X" in the top right corner
      6. Click on "OK"
      REMEMBER: When you are about updating your status, DO NOT "CHECK IN" else, you will be asked to "Turn on your Location services"
      Do you know of any other way to turn off Facebook Location? Do let us know in the comment box. Also hit on the share buttons!

      READ ALSO: Deactivate and reactivate your account

      Read More
      • Share This:  
      •  Facebook
      •  Twitter
      •  Google+
      •  Stumble
      •  Digg

      How to Change Name on Facebook Profile

       Access Facebook, Account, Deactivate Facebook Account, Login, Name, Profile, Settings     No comments   

      Facebook has actually just recently begun actively requiring its users to enter their genuine name under initially, last, and middle name (this was constantly the primary policy, however, Facebook implemented it loosely, unlike Google Plus - that most likely altered to combat spam accounts from being produced for enjoyable - or other functions:

      How to Change Name on Facebook Profile Link
      This is where the alternate names been available in: you can amount to 8 various names, consisting of label, first name and married name, an alternate spelling of your name (aka "typical misspelling"), your daddy's name, birth name, as well as a name with title. If you're not in the witness security program, you can even include your "previous name" - all displayed in the screenshot.


      As soon as you are logged into the Facebook represent which you wish to alter your screen name, click the drop-down arrow button in the leading right corner of the page, and choose "Settings" from the menu.

      On the next page, ensure that the "General" alternatives are selected in the left pane, and click the Edit link beside your "Call":

      Crucial: do not go into a joke name, because Facebook will not let you alter it for 60 days! Because it requires you to utilize your original name (see list below), you will not have the ability to go into something too wacky.

      Modification of your given name and surname, and additionally go into a middle preliminary or name. If you are done, click the Evaluation Modifications button; based on exactly what you got in, you might get the following mistake message, which Facebook has begun imposing recently: "We need everybody to utilize their true name on Facebook. If you want to include an alternate name, you might do so after you alter your name".
      Read More
      • Share This:  
      •  Facebook
      •  Twitter
      •  Google+
      •  Stumble
      •  Digg

      How To Find Archived Messages On Facebook Messenger

       Archive Group, Messages, Messenger     1 comment   

      How To Find Archived Messages On Facebook Messenger: Is there really a way of recovering your archived messages on Facebook messenger? I think there is and that's why I'm writing this article right now.

      We are going to be using two device (Android and iPhone) to demonstrate how to find your archived messages on Messenger.


      Key terms:  how to unarchive messages on messenger app, how to view archived messages on facebook messenger android, how do i find my archived messages on facebook messenger, how to delete archived messages on messenger, how to see archived messages on whatsapp, how to see archived messages on messenger app iphone, where is the more button on messenger, how to get an archived chat back on messenger.


      How To See Archived Messages On Facebook Messenger - Using Android.

      1. Open the Facebook Messenger App. Facebook Messenger is a blue speech bubble icon with a white lightning bolt in it.

      2. Tap House. It's the icon that appears like a home, and it seems on top left corner simply under the search bar.

      3. Press and hang on a discussion. Doing so will expose a pop-up menu.

      4. Tap Archive. The discussion will be relocated to the "Archived" folder.

      5. Tap the blue speech bubble icon. It remains in the bottom-right corner of the screen, and doing so will begin a brand-new discussion.

      6. Key in the recipient of your archived discussion.

      7. Tap on the recipient's name. You will now see the archived messages from the discussion appear in the chat window.

      How To Find Archived Messages On Facebook Messenger


      How To Find Archived Messages On Facebook Messenger - Using iPhone.

      1. Open the Facebook Messenger App. Facebook Messenger is a blue speech bubble icon with a white lightning bolt in it.

      2. Tap House. It's the icon that appears like a home, and it seems in the bottom left corner of the screen.

      3. Swipe left on a discussion to expose your alternatives.

      4. Tap More. It's the gray button with three horizontal lines stacked on top of each other.
       
      5. Tap Archive. The discussion will be relocated to the "Archived" folder.

      6. Tap the blue "+" icon. It lies in the leading right corner of the Messenger screen. Doing so will begin a brand-new discussion.

      7. Enter the recipient of your archived discussion.

      8. Tap on the recipient's name. You will now see the archived messages from the discussion appear in the chat window.

      Hope this Facebook tutorial was explanatory. If are still having any complain, please leave a comment. Also see other useful pages below:

      • How to Recover Deleted Facebook Messenger Messages 
      • How Do I Delete Messages Or A Conversation? 
      • How to block someone on Facebook Messenger

      Read More
      • Share This:  
      •  Facebook
      •  Twitter
      •  Google+
      •  Stumble
      •  Digg

      Download Facebook Videos Online 2018

       Videos     No comments   

      Download Facebook Videos Online 2018 - Do not download any software to do this! Just follow these steps. 1. replace the www in the URL with m. e.g. http://web.facebook.com/blahblah - http://m.facebook.com/blahblah 2. this brings you to the FB mobile site, once there click on your video. 3. While the video is playing if you are on a pc right click on the video screen and select "save video as" (sorry cant help the mac and linux folks out there) and pic a location on your pc to save the video.

      Download Facebook Videos Online 2018
      Search terms: 
      how to download facebook videos on androidhow to download video from facebook to computerhow to download videos from facebook to iphonesave video from facebookfacebook video downloader chromedownload private facebook videosfacebook video downloader appfacebook video to mp3


      Alternatively - Download Facebook Videos Online 2018


      1. replace the www in the URL with mbasic.
      e.g. http://web.facebook.com/------ to - http://mbasic.facebook.com/------
      2. this brings you to the facebook mobile site, once there you get in click on your video.
      3. While the video is playing if you are on your PC right click on the video screen and select "save video as" and pic a location on your PC to save the video.
      Read More
      • Share This:  
      •  Facebook
      •  Twitter
      •  Google+
      •  Stumble
      •  Digg

      Hide Friends List On Facebook

       Access Facebook, Facebook App, New Facebook, People, Settings     No comments   

      Facebook has revealed brand-new personal privacy settings that give customers some extra control over exactly what information they share, while eliminating the capability to conceal a couple of items of info from the general public.
      Hide Friends List On Facebook

      Hide Friends List On FacebookOne certain item of openly readily available info-- individuals' buddies checklists-- caused a little an uproar from a number of fields, consisting of business individuals that don't necessarily intend to reveal their professional networks to the general public and also their competitors. It is also a problem to some moms and dads who could not want their children-- or a list of their youngsters' buddies-- to be commonly offered.

      See: Facebook Logout My Account 2017

      Facebook swiftly backtracked. A day later, the firm introduced on its blog that users could now uncheck the "Show my friends on my profile" alternative in the Pals box on their account to ensure that your buddy listing will not appear on your publicly readable account.

      Unfortunately, they weren't really clear on exactly how you make the modification. You will not find this checkbox in your Facebook privacy setups. Instead you need to follow these actions:

      1. Click Account on the blue bar a the top of the screen:
      Hide Friends List On Facebook

      2. Scroll to the beginning of your Friends list and also click the pencil to the right of the word Friends:
      Hide Friends List On Facebook


      3. Uncheck the box that states "Show Friend list to everyone":
      Hide Friends List On Facebook

      You can't conceal your buddies from your buddies and applications. But unchecking that box will conceal your close friends checklist when a non-Facebook close friend sights your public account, yet it will not hide your Facebook close friends checklist from your friends when they consider your profile. Also, this details will be readily available to applications and application programmers.

      See: Create New Facebook Account 2017
      Furthermore, this procedure does not conceal various other openly offered details including your name, account picture, sex, current city, networks you belong to, and also pages you're a follower of.
      view My Account ... on the upper ideal section of that page.


      Read More
      • Share This:  
      •  Facebook
      •  Twitter
      •  Google+
      •  Stumble
      •  Digg

      Facebook Messenger App Review

       Access Facebook, Android, App, Facebook App, Facebook Login, FB, Login, Messages, Messenger     No comments   

      Facebook Messenger app is a messaging app for the popular social media, Facebook. It was established by the very same group who produced among my most utilized messaging apps, Beluga which I use rather regularly. If you have utilized Beluga before, Facebook Messenger will be rather familiar as they share a fair bit in typical with each other. Facebook Messenger permits you to send out and get messages with your good Facebook friends in whole time, immediately whether it be with somebody who is likewise utilizing the app or a good friend who is using Messenger through the Facebook site. You can even talk with users through SMS if they have that alternative allowed.
      Facebook Messenger
      See: Who Owns Whatsapp?

      Facebook Messenger App Review
      The app permits you to message anybody you are friends with on Facebook. All you have to do is click the brand-new message button and type the name of the contact you wish to compose to. Messages can consist of original text, pictures, as well as area info. You can even begin a group message among your good friends where anybody consisted of in the group can address back and see exactly what everybody else is composing. All messages are sent out and gotten immediately and can be regarded in the Facebook Messenger app or on the Facebook site using chat window.

      Exactly what the app does not have is a friend list that reveals who is online at any provided time. In truth, there isn't a friend list at all in the conventional sense. It is presumed that you understand who your Facebook buddies currently are and if you now speak with somebody frequently on Facebook, you ought to know their names all right to type them in just.

      See: How to Turn Off Videos on Facebook
      Facebook Messenger isn't your typical messaging app. In truth, those of you who are drawn to using apps like GOAL, Yahoo, or other IM app might discover Facebook Messenger a bit disconcerting because of one essential thing, an absence of a pal list that reveals who might be online. However, it is my viewpoint that Facebook purposefully made the app like that since they desire you to presume that everybody is online. I suggest if you are a heavy Facebook user, you need to currently understand which buddies are typically on all the time and which kind friends have likewise downloaded the Facebook Messenger app.

      Even if they do not have the app, many people have the regular Facebook app set up and given that Facebook Messenger is likewise linked with messages on the website, the Facebook app will turn up a notice that you have a message waiting. Anyways, if they do not address back, it implies they do not wish to message back or cannot. Exactly what's the distinction in between that and somebody not responding to back your SMS? None.

      See: How Do I Add Admin to Facebook Page


      Read More
      • Share This:  
      •  Facebook
      •  Twitter
      •  Google+
      •  Stumble
      •  Digg

      How to Follow A Person on Facebook

       Access Facebook, Business Page, Facebook Page, Followers, Messenger, People     No comments   

      How to follow person on Facebook - Sometimes, besides the Add friend switch on a person's Facebook Timeline, you'll see an extra button 'Follow'. Complying with individuals on Facebook is a means of obtaining updates from them in your Information Feed without actually becoming their good friend. Individuals follow people like reporters, celebrities and even pages.
      Facebook Follow
      Following somebody is very easy  - in fact, it's much easier compared to - including someone as a close friend. Browse to that individual's Timeline and click the Follow button. To Unfollow also, click that same button (it currently states Follow).

      See: How to Hide Who You Follow on Facebook

      If you're a person that intends on publishing great deals of public updates or are a celebrity (in your area or across the country), you could enable individuals to follow you rather than becoming your pal (they'll likewise have the ability to include you as a friend, however you will not need to approve their ask for them to see your blog posts). Adhere to these actions to permit individuals to follow you:

      How to Follow A Person on Facebook
      1. On the top Menu bar click the Triangle sign in the upper-right edge of your Facebook.
      A good selection of choices shows up.

      2. Select the Settings option.
      The Account Settings web page shows up, which has a list of options the left-hand side.

      3. Select Public Posts from the list of settings on the left- hand .
      The Public Posts web page shows up.

      4.  On the "Who Can Follow Me" tab, Select on Public and save settings.

      Congratulations! Individuals could currently follow your free articles. As soon as you choose right into this function, even more, setups show up on the webpage. These settings enable you to define just how fans could locate as well as engage with your Timeline. This is likewise where you could attach a Twitter account so your tweets will certainly additionally be imported to Facebook.

      See: Facebook Logout My Account 2017


      Read More
      • Share This:  
      •  Facebook
      •  Twitter
      •  Google+
      •  Stumble
      •  Digg

      Ways to View Deleted Messages on Facebook

       Access Facebook, Account, App, Archive, Messages, Messenger, People, Profile     No comments   

      Everyone’s done it – deleted a Facebook message they meant to keep (sometimes the trigger-happy clicker finger can cause serious remorse.) People think they’ll never see their messages again. But this is not the case. That’s right, a time machine isn’t necessary to retrieve deleted messages. Facebook knows the accidental deletion of messages can happen and they’ve created an easy way for anyone with an account to go back and view everything they’ve done on their account.


      See: How to See Someone's Location on Facebook

      Recover deleted Facebook messages from a downloaded archive

      In order to receive deleted messages in Facebook, you’ll first need to log-in to the Facebook account you want to retrieve messages from.

      STEP 1 : Go to “Account Settings”

      After you’re logged in, go to “Account Settings” in the top right corner of the window.
      STEP 2: Once the “General Account Settings” page loads, click on “Download a copy of your Facebook data” at the bottom of the page.

      Download Your Archive

      STEP 3: After you click on the “Download a copy…” link, you’ll be brought to a page where you can download everything you’ve done on your Facebook account since the birth of your account. Click on the green button that says “Start My Archive.”


      See: How to Login Instagram With Facebook 2017
      After you click the green button, the small dialog box “

      STEP 4: Request My Download,” will open, informing you it can take a while (typically 2-3 hours) to gather all of your information. Click “Start My Archive” again to launch the gathering process.


      STEP 5: And that, you’ll be told to go to the email account associated with your Facebook profile where a download link to your archive will be sent. Again, it may take 2-3 hours to arrive. Once it does, click on the link in the email to download your archive.


      STEP 6: And before you can download the archive, you will need to reenter your password.


      STEP 7: Finally, click on “Download Archive” button that appears after entering your password. Your archive will download to your computer. Unzip it, then open the file named “index.”

      The file containing your archived data will open and click on “Messages” and all of your past messages will load.


      To easily find the message you’re looking for, search by keyword. Press “CTRL + F” or “F3” to access the keyword search process, and that’s it. Once you find the message, copy and paste the contents into a Word document to save.


      See: Facebook Logout All DevicesYou’ve got to love Facebook for providing such an in-depth archiving feature. There is a myriad of reasons people need to retrieve deleted messages, and this feature fills this need. Just remember, it can take a few hours to extract your archive, so plan accordingly.
      Read More
      • Share This:  
      •  Facebook
      •  Twitter
      •  Google+
      •  Stumble
      •  Digg
      Newer Posts Older Posts Home

      Blog Archive

      • ▼  2018 (156)
        • ▼  October (131)
          • ▼  Oct 23 (19)
            • How To Change your Login Password for facebook | C...
            • How to Deactivate or Delete Facebook Account
            • Have you deleted your Facebook account temporarily...
            • Delete or Deactivate Facebook Account
            • How Can I Deactivate My Facebook Account Temporarily?
            • Create New Facebook Page | How to create a Faceboo...
            • How do you create a private event on Facebook?
            • How to delete faceɓook account permanently
            • Are You Just Tired Of Facebook? Delete or Deactiva...
            • The new hoax on Facebook - following me
            • How to delete Facebook Account Permanently on Andr...
            • How to Check Archived Messages on Facebook App And...
            • How to Block My Friends List On Facebook 2018
            • Change Facebook Name
            • How to Turn off Facebook Location
            • How to Change Name on Facebook Profile
            • How To Find Archived Messages On Facebook Messenger
            • Download Facebook Videos Online 2018
            • Hide Friends List On Facebook
          • ►  Oct 16 (49)
            • Facebook Messenger App Review
            • How to Follow A Person on Facebook
            • Ways to View Deleted Messages on Facebook
          • ►  Oct 14 (63)
        • ►  April (25)
          • ►  Apr 11 (25)

      Search

      Copyright © Whatsapp Review